
Easy step by step Instructions for Mounting Your Nail Polish Rack Shelves on a typical wall. Easiest way to add accessible storage on any space! Pretty Display Acrylic Nail Polish Rack shelves feature with unseen mounting system that save place and beautiful, just like floating on wall! They are an elegant way of displaying collectibles, nail polish and essential oils. Here we will show you Instructions for Mounting Your Nail Polish Rack Shelves.
“It’s so easy I can do it myself without chipping my nail polish!”
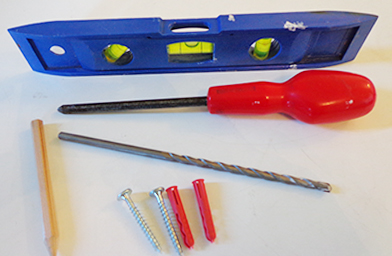
1. WHAT YOU NEED TO MOUNT THE NAIL POLISH RACK SHELF
You will need :
You will need :
- a spirit level
- a drill with a 7/32 inch/ 6mm masonary drill bit
- pencil and eraser or damp cloth
- Phillips screwdriver
- measuring tape
2. CHOOSE WHERE YOU ARE GOING TO PUT THE NAIL POLISH SHELVES
Hold the nail polish shelves up against the wall and arrange them as required. If mounting vertically leave at least a 4 inch gap between shelves to allow access to the jars & bottles.
Hold the nail polish shelves up against the wall and arrange them as required. If mounting vertically leave at least a 4 inch gap between shelves to allow access to the jars & bottles.
3. CHECK FOR WATER PIPES OR ELECTRICAL CABLES
It is very important to check that there are no water pipes or electrical cables inside the wall – we don’t want any accidents! If in doubt, choose somewhere else.
It is very important to check that there are no water pipes or electrical cables inside the wall – we don’t want any accidents! If in doubt, choose somewhere else.


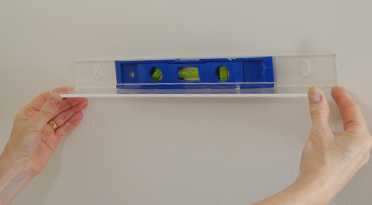
4. CHECK THE LOCATION OF ALL SHELVES
Hold the nail polish shelf steady against the wall in the location you want it. It is important to check all the shelves look good before you start drilling.
Hold the nail polish shelf steady against the wall in the location you want it. It is important to check all the shelves look good before you start drilling.
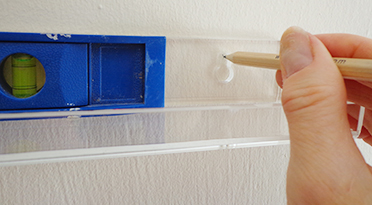
5. MARK THE POSITION OF THE HOLES
Hold the shelf firmly against the wall and check that it is level. Hold it steady and use the pencil to draw around both the hole shapes on the wall.
Hold the shelf firmly against the wall and check that it is level. Hold it steady and use the pencil to draw around both the hole shapes on the wall.
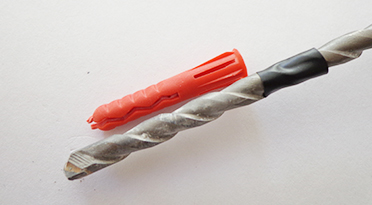
6. MARK HOW FAR YOU NEED TO DRILL
Tip! You will need to drill to a depth a little longer than the screw anchor. It helps to mark this on the drill bit before you start, eg. with some tape.
Tip! You will need to drill to a depth a little longer than the screw anchor. It helps to mark this on the drill bit before you start, eg. with some tape.
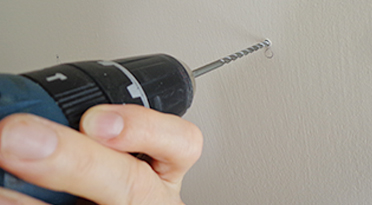
7. DRILL STRAIGHT INTO THE WALL
Hold the drill at right angles to the wall and drill slowly at first to reduce wobble where you marked the wall. You can apply more pressure as the drill goes in.
Hold the drill at right angles to the wall and drill slowly at first to reduce wobble where you marked the wall. You can apply more pressure as the drill goes in.
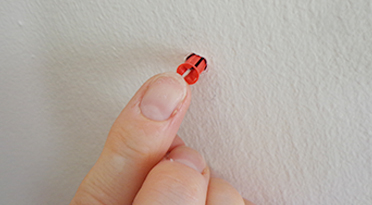
8. INSERT THE SCREW ANCHORS
Rub away any remaining pencil marks and then gently push the screw anchors all the way in until they are completely flush with the wall.
Rub away any remaining pencil marks and then gently push the screw anchors all the way in until they are completely flush with the wall.
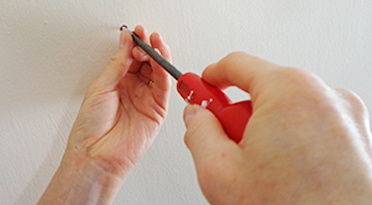
9. SCREW IN THE SCREWS PART WAY
Screw the screws into the screw anchors. Do not go in all the way, leave enough room to insert the shelf.
Screw the screws into the screw anchors. Do not go in all the way, leave enough room to insert the shelf.

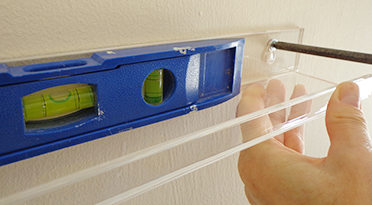
10. MOUNT THE SHELF OVER THE SCREWS
Mount the nail polish shelf over the screws and check it is level, adjusting the sides slightly up or down as required.
Mount the nail polish shelf over the screws and check it is level, adjusting the sides slightly up or down as required.
11. TIGHTEN THE SCREWS TO HOLD IN PLACE
Gently tighten the screws while holding the shelf level to hold the shelf firmly in place.
Gently tighten the screws while holding the shelf level to hold the shelf firmly in place.

12. RINSE AND REPEAT
Put up the other nail polish shelves, add the nail polish, essential oils or whatever you choose and you’re all done!
Put up the other nail polish shelves, add the nail polish, essential oils or whatever you choose and you’re all done!